Google Maps has this efficient and fast approach referred to as dropping the pin that you’ll locate beneficial. Below, we’ll show you how to use this technique on either your mobile phone or computer.
Dropping pins in Google Maps on mobile
One of the most recent version of Google Maps has made it much easier to drop a pin from the search box– as a matter of fact, it drops a pin instantly, whether you desire it or not. It presumes if you are looking for a particular address, you want a pin dropped there. So when you make use of the search box to locate an address, depend on a pin being transferred there instantly. You still have to touch and hold if you are using the map user interface rather than the search box to discover a location.
- Step 1: Open Up the Google Maps app on your apple iphone or Android phone.
- Step 2: Search for an address utilizing the search bar on top of the screen or scroll around the map till you locate the location where you wish to drop a pin.
- Step 3: Press as well as hold the screen to go down a pin. A light touch is all that’s needed.
- Step 4: Tap the pin to obtain instructions to that place and also share or save them.
- Step 5: To get rid of a pin, simply squeeze out, and a box at the top analysis Dropped Pin or the Particular Location appears with an X on the appropriate side. Tapping that X gets rid of the pin.
Going down pins in Google Maps on computer
- Step 1: Browse to the Google Maps website.
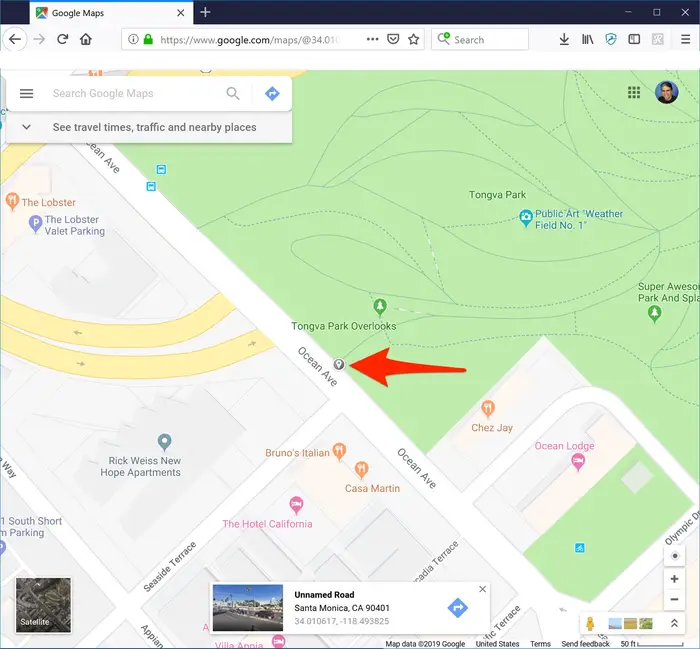
- Step 2: Look for an address using the search bar on the upper left side of the screen or scroll around the map up until you discover the place where you want to drop a pin. The search bar instantly drops a pin at the area you browsed. You don’t need to do anything else.
- Step 3: Left click the place you intend to go down the pin. You may have to zoom in or click a little to either side of the area you wish to drop a pin if there is already a pen there. A little gray pin will certainly show up, as well as a details box near the bottom right of the display.
- Step 4: You can push the navigation symbol in the details box to obtain instructions to the gone down pin or click anywhere else in the box to raise even more details concerning the place you’ve selected.
- Step 5: From the additional info display, you can click Save to conserve the pin to Your Faves, Intend To Go, Starred Places, or a New Listing. You can see saved pins under Your Places in the main food selection.
Going down numerous pins by producing a map on desktop
If you wish to see each of your different pins at the same time, you can conserve each in the Your Places data. Nonetheless, realize that you can not see all of your pins on one single map, as Google Maps only allows you see one pinned location per map. If you need to publish all your pins on one map, you’ll have to develop your own map.
Producing a map of your own allows you to see the different pins in a simplified method while additionally revealing you just how they relate geographically. This is particularly practical when you wish to measure the range and also relationship between each of your preferred pinned places. We’ve described some easy steps below to teach you exactly how to produce your very own Google Map.
- Step 1: Browse to the Google Maps site.
- Step 2: We intend to state that you don’t need to be checked in to your Google account to leave individual pins. Nonetheless, you need to be logged in if you want to save the pins. You likewise must check in to your account when you wish to develop a Google map.
- Step 3: Touch the menu icon at the top left side of your screen.
- Step 4: After this, click Your Places, then Map, as well as last but not least Create Map.
- Step 5: Click Untitled Map to give your map a proper name and also key in a short description if you want. Do not leave without clicking Conserve when you’re completed.
- Step 6: You can record a specific place by touching on the marker symbol (this is located right below the search bar). You can touch a specific location to add a pen for this certain area, or you can conveniently utilize the search bar as well as key in your place of choice to locate it.
- Step 7: Click the Add Directions icon in the icon bar underneath your very first location’s summary. You might see it turn up at the top of the screen next to the initial pen. As soon as you finish this step, you will certainly notice an An area and also a B field in the bottom left of the page. From here, you can swiftly carry out an area search and also utilize the side food selection to keep including added destinations. You’ll see that your map will immediately connect to the places.
- Step 8: If you’re a person who only plans to use this map for individual functions, the last step was your final step. There’s no requirement to do anything else. On the other hand, if you wish to share your map with one more individual, you’ll require to click the symbol in the leading left corner. After doing this, you’ll be able to see a sneak peek of your map before you share it.